Instructions for converting custom reports from earlier versions of Track-It!NOTE: If you are running Track-It! 8.x, be sure you are running build 8.0.23.71 or higher.
- For Track-It! 6.5 or 7, install Crystal Reports 9.0 on one Workstation or go to a machine that has it installed.
- For Track-It! 8.x, 9, 10.x or 11.x install Crystal Reports 11 or go to a machine that has it installed.
- Double click to open the custom report in Crystal Designer.
- Click the Database menu and select Set Datasource Location.
- The Set Datasource Location window will appear.
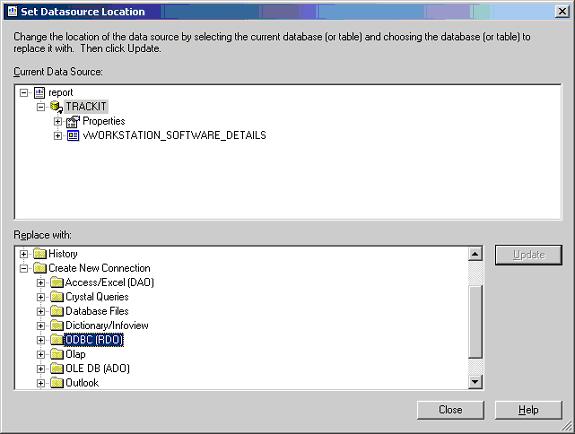
![]()
- In the bottom pane, click the Create New Connection item to expand it.
- Expand the ODBC (RDO) type. A new Datasource Selection dialogue will appear.
- Choose the Trackit DSN from the list and then click Next.
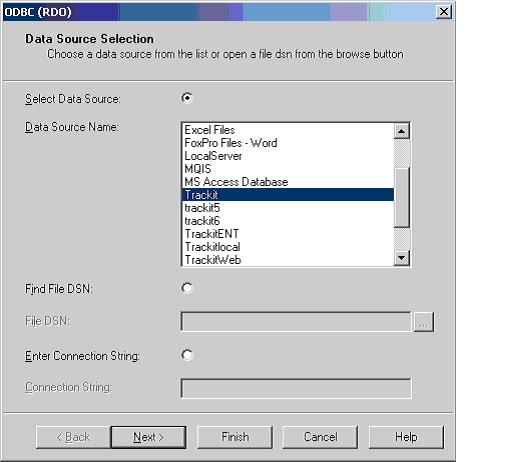
![]()
- Enter the username and password if prompted:
- Track-It! 6.5 - By default, the username is TRACKIT65 and the password is BLUEOCEAN.
- Track-It! 7 - By default, the username is TRACKIT70 and the password is BLUEOCEAN.
- Track-It! 8.x, 9, 10.x and 11.x (SQL Server Database) - By default, the username is TRACKITRPT and the password is TI_DB_P@ssw0rd.
NOTE: When Track-It! uses a SQL Server database, the username in Track-It! 8.x or 9 may vary (ie. TRACKITRPT_1, TRACKITRPT_2, _3, _4, etc). Check the
TRACKIT_USER value in the
Trackit.cfg file, which is found in the root of the
Track-It! Server folder, to see if the TRACKIT80 user listed there has an underscore and number following the name. If so, use that same number for the TRACKITRPT user.
![]()
- Click Finish.
- The next screen will allow you to re-map tables and fields, if necessary.
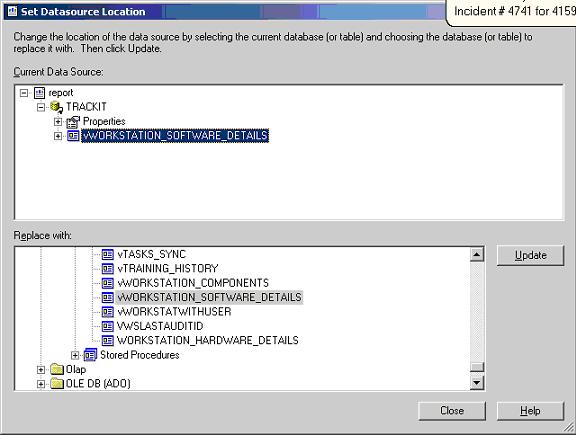
![]()
- Highlight the table or view in the top window, and then find the matching table or view name in the bottom window by expanding the database name -> dbo -> Tables (or Views). Once the matching object name is found and selected, click the Update button.
You may need to do this several times if your report contains multiple tables or views.
- Click Close to close the Set Datasource Location window.
- Click Database => Verify Database from the main Crystal Reports window.
Your report should be up to date.
- If you receive messages that state �Table has changed, proceed to fix up the report�, Click Yes to these messages.
- Save the changes to the report once it has been converted.
NOTE: When running Track-It! 8.x or 9, after converting the report file for use in that version, you must import it into Track-It! in order to run it from Technician Client. Please see
article 000008943 for information on importing the custom report.
If your reports contain date/time fields, please see
article 000008697 for information on how to convert the date/time fields to use the new Multi-Time Zone functionality of Track-It! 6.5. If the report is not updated to use the time zone conversion feature, times within the reports, depending on workstation time zone, may appear to be several hours ahead of the values seen in Track-It!